We’ve all seen those amazing National Geographic images and thought, “How do they produce such great pictures?” The camera? Well years of practice is the answer.
It has nothing to do with the kit. A £15,000 camera doesn’t guarantee better images than your compact. What does guarantee good images is an understanding of the principles of photography, lighting, shutter speeds, white balance, and focal lengths. This is where we come in, we’re going to help you learn how to photograph wildlife so next time you’re somewhere like these animal hotspots you can capture the perfect image.
Photography 101
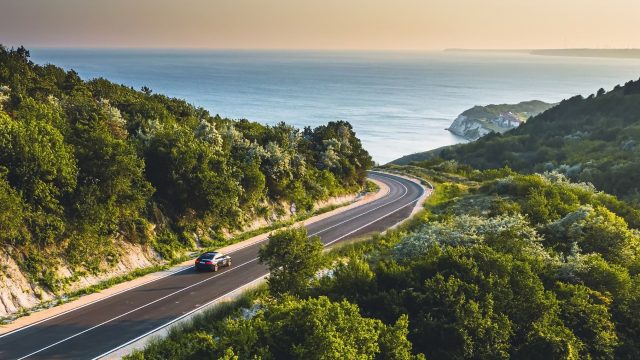
The golden hour: The best time of day to get great photographs is the first hour of light in the morning and the last hour of light at the end of the day. The light is diffused and easier to work with as it gives your subject a richer, deeper colour.
White balance: White balance (WB) is the process of removing unrealistic colour casts, so objects which appear white in person are white in your photo. You’re basically resetting the camera to record the colours your eyes see. All digital cameras have an automatic function but it’s always worth carrying a piece of white paper to do the job properly.
Bokeh: Bokeh or Boke is one of the most important subjects in photography and helps make photographs visually appealing. Bokeh forces us to focus our attention on a particular area of the image whilst ensuring the blurred areas still look good. Sounds difficult? That’s because it is.
 Photo by: Floydine/Fotolia
Focal length: The focal length is the distance between the lens and the image sensor when the subject is in focus, usually stated in millimetres (e.g. 50 mm, 100 mm). Zoom lenses display both minimum and maximum focal lengths e.g. 200–400 mm.
F-number: AKA focal ratio, f-ratio, f-stop, or relative aperture. It’s the ratio of the lens’ focal length to the diameter of the entrance pupil.
ISO: ISO is the camera’s level of sensitivity to available light. The lower the ISO number, the less sensitive it is to the light. The higher the ISO number the more sensitive it is to light. Get the ISO wrong and your image will appear grainy or full of “noise”. To be on the safe side, stick to the lowest ISO setting on your camera.
Rule of Thirds: The Rule of Thirds is perhaps the most well-known principle of photographic composition. Essentially you’re breaking an image down into thirds (both horizontally and vertically) so that you have 9 parts e.g.:

By placing points of interest in the intersections or along the lines, your photo becomes more balanced. Some cameras allow you to overlay a grid on the display screen to help with this.
Camera choice & equipment
A camera with interchangeable lenses is best. Unless you can tempt animals to you or can get close to them without scaring them, you’ll be shooting from a distance which makes having a telephoto lens essential. You can however use a compact camera with a long zoom to good effect if you know the basics.
Always carry a sun hood in case you’re shooting into the sun. If shooting through glass, a polarising filter will help to reduce both reflection and the amount of bounce light so that textures and tones stand out more. If you use big lenses, you’ll need a tripod.
Composition
General practice is to frame the shot so the animal is to one side and looking into empty space. Try not to centre the main focus point as this can make the shot dull and uninspiring.
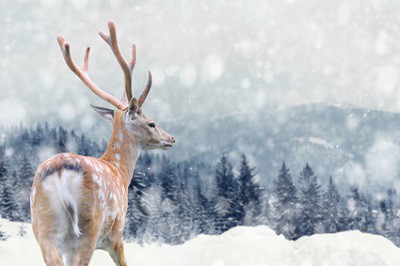 Photo by: byrdyak/Fotolia
Landscape
Make sure you consider depth of field when photographing landscapes – this is the distance between the nearest and farthest objects in a scene that appear acceptably sharp in an image. To increase the depth of field, choose a smaller aperture and then manually focus at the hyper focal distance.
Portrait
Don’t use a wide-angle lens for portraits as it will distort features and create an unflattering result. Shoot in burst mode so you can capture a range of expressions without worrying about people blinking.
Movement & panning
If trying to photograph a bird in flight, it can be tricky to achieve a clean shot. This is where panning comes in. Use a slow shutter speed to blur some or all of an image when you’re shooting birds, cheetahs, or other fast moving animals. Pan the camera to follow the movement and keep it sharp while blurring the background.
The use of a monopod can also help with panning. You can spend anywhere between £25 – £200 on one, but this helps keep the camera level and avoids juddering or sudden movements.
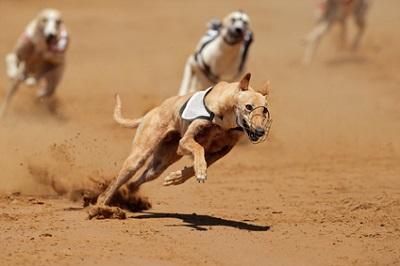 Photo by: EcoView/Fotolia
Mobile phones
These days, the camera on mobile phones are pretty powerful and functionality is improving all the time. But do you know how to use them to the best of their capability?
iPhone tips
- To take a picture, press the + Volume button.
- Use HDR mode to capture perfectly exposed images.
- Use Panoramic mode to squeeze in everything or take a 360° shot.
- Activate burst mode by pressing and holding the capture button.
- Turn on the Rule of Thirds grid in Settings > Photos & Camera > Grid
Samsung Galaxy tips
- Turn on the Rule of Thirds grid in Camera Settings > Grid Lines
- Use HDR mode to capture perfectly exposed images.
- Save time by turning on the ‘tap to take pics’ mode.
- Select metering modes to optimize exposure.
- Use Selective Focus for a blur effect.
- Activate burst mode by tapping the Settings icon and then selecting Burst Mode.
Alternatively, if you have a GoPro camera, these can be used to capture some great stills. You can get a large range of accessories, such as a chest harness, tripod mount or a GoPole (basically a monopod for a GoPro). This may all sound a bit extreme, but you can use these to get some wonderful time lapses too.
Editing software
When it comes to touching up and editing your photos, there are a number of packages to choose from.
Adobe Photoshop is perhaps the best known but can be tad expensive for an amateur with prices starting at £8.57 per month for an annual plan. Alternatively, you can pick up the basic Elements package for around £50.
Corel PaintShop Pro X8 is almost as powerful as Photoshop but can be much slower. It’s currently available for £71.99 which makes it more attractive for part time snappers than the full Photoshop but not as good as Elements.
Serif PhotoPlus X8 is great for beginners and comes with a range of tools to provide a great introduction to photo editing. It can be yours for £59.99.
ACDSee 17 offers a nice selection of standard and advanced editing tools. It has a clean and user-friendly interface which makes the software easy to use. $50 a year.
PhotoPad Photo Editor’s main highlight is it can be downloaded to a tablet. It’s good for beginners and those who aren’t editing many images but not suitable for pros. Costs around £20 at the moment.
How to photograph wildlife tips
- Read the manual. Make sure you know what everything does and why.
- Focus on one subject. Focus on the eyes and face and ensure the background is out of focus.
- Think about composition. Use the rule of thirds as a starting point but don’t be afraid to break it.
- Take lots of pictures.
- Use binoculars. Aim your camera through a pair and it serves as a makeshift zoom lens.
- Head to the zoo. You can spend as long as you want practising with different lenses and settings without losing sight of the animal.
- Fill the frame. If the background is dull, cut it out. Zoom in on your subject as far as you can without cutting off any limbs. Conversely, an interesting background can improve the photo.
- If you want great photos of birds, you need a fast action camera. Ideally you need a camera that offers a shutter speed of at least 1/2000 of a second with 6 to 9 fps (frames per second).
If you’ve got some great photos of animals, email them into us and we’ll post them here to help inspire others. Also, don’t forget to sign up to our newsletter and follow us on Twitter and Facebook for the latest travel tips and news.
Subscribe to our newsletter
Want our blogs emailed direct to you? Sign up below to get updates featuring our blogs and car hire top tips. Receive the best deals on car hire straight to your inbox.